Xcode 4's Less Obvious Shortcuts
· Ted
Introduction
At the time of writing, it has been nearly 20 months since Xcode 4 was released to us. The user interface underwent a massive change into a more integrated, mostly one-window (more on that later) view of your code. It’s been a painful transition at times, but it’s now becoming a very solid tool to develop with. I thought that having finally gotten pretty comfortable with it, I’d share some of the particularly useful hidden features and shortcuts I use on a daily basis.
This is not an exhaustive view of the tool - see the manual for that. Nor is it a complete list of the shortcuts - other people have already done a very good job of that. I hope you find something useful nonetheless.
Some terminology
This is the boring bit, but it is best to agree on some terminology so we know what we’re talking about.
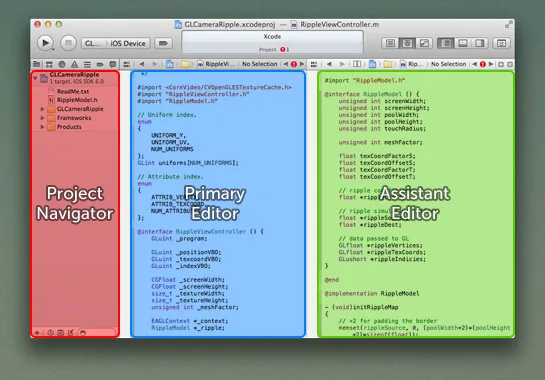
When the editor area is split as in the image above, the file browser is called the ‘Project Navigator’, the left hand editor is the ‘Primary Editor’ and the right hand half is called the ‘Assistant Editor’.
Global help search
If you only learn one keyboard shortcut, learn this one:
⌃ + ⌘ + / - Search Help
This will bring up the search box in the help window. Having learnt our terminology (this is where knowing what Apple calls things is really important), start typing a word or phrase contained in a menu item you want to activate. It will then appear in a list underneath. If you navigate through using the ↑ and ↓ keys, Xcode will show you not only where in the menu these items are, but what their keyboard shortcuts are if they have one. Next time you forget a shortcut, don’t take your hands off the keys - you’ll learn much faster.
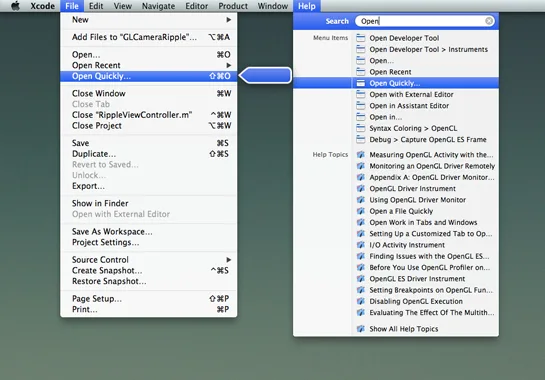
OK, I cheated a bit - this actually works in any Cocoa application.
Text Editing
Move a line up and down
This is a little known gem, it might not sound useful at first, but I must use it dozens of times a day. So you’re doing some refactoring or shifting some logic around. This mostly involves moving chunks of code up and down in the same file or in and out of if blocks. Usually a lot of copy, paste and annoyingly fine mouse work.
⌥ + ⌘ + [ - Move Line Up
⌥ + ⌘ + ] - Move Line Down
The whole line your cursor is on (or multiple lines if your selection crosses them) will get moved up and down through the surrounding code. The indentation will be magically fixed as you move the code around. No more copy and pasting.
Edit all in scope
I was sitting in the audience at the 2011 WWDC when this got announced. It was met with spontaneous applause by the developers in the audience. I’m not sure if that was a comment on the feature or how hyped up everyone was. Since then I think it’s been largely forgotten.
If you decide that you wish to rename all instances of a variable, but only within a certain scope, you can select one of the instances and then hit:
⇧ + ⌘ + e - Edit All in Scope
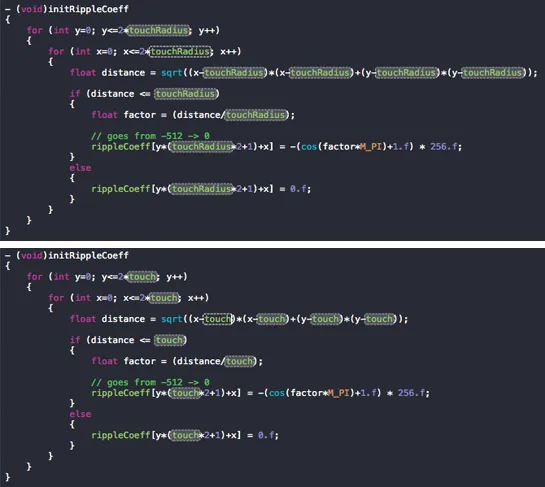
You’ll now see that all instances are selected with boxes around them. Editing any one of these will update all of the others as you type. Again, this is a great tool for refactoring and cleaning up your code. Each minor update to Xcode seems to have made this more and more effective at finding all uses of a variable.
Switch between placeholders

As you type, Xcode helpfully suggests methods and other template-based code blocks. When you select one of these you’ll get a series of grey boxes you need to fill in. Rather than clicking these in turn, you can use the keyboard to flick between them.
⌃ + / - Jump to next placeholder
⌃ + ⇧ + / - Jump to previous placeholder
Format selection
I used to spend a lot of time going through and manually re-indenting my code. Fortunately there’s a shortcut for that:
⌃ + i - Re-indent code
Xcode will use its code sense to indent the currently selected lines correctly.
Debugging
Set a breakpoint
Normally we set and unset breakpoints by clicking in the margins of the document. You can also set one via the keyboard:
⌘ + \ - Add Breakpoint at Current Line
⌘ + \ - Remove Breakpoint at Current Line
One click edit a breakpoint
What a lot of people don’t know is that to edit a breakpoint you don’t need to right click on it and then press ‘edit’. You can instead hold down ⌥ + ⌘ whilst left clicking to bring up the edit window.
Clear the debugger console
Often the console gets full of output and we’re about to start some debugging whilst printing values out. At that point it’d be nice to clear the current contents:
⌘ + k - Clear Console
This actually works in the Terminal application as well.
Files
Quick Open
Perhaps one of the most important features of an IDE (Integrated Development Environment) is being able to quickly and efficiently navigate both your files as well as the structure of your code.
There is a Quick Open shortcut in Xcode to navigate to files:
⇧ + ⌘ + o - Open Quickly
This takes a number of different forms of input. Firstly, you can either match file names or symbols. If you go for a symbol, Xcode will jump to its definition. This can be great for exploring the framework header files as well as your own code.
Partial match
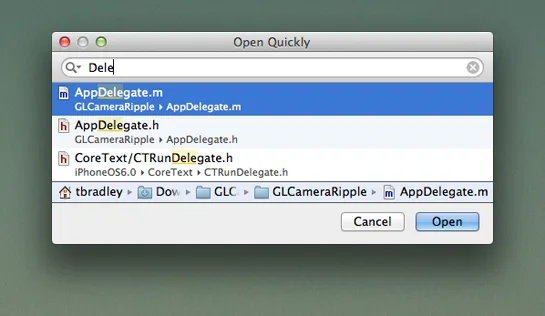
You don’t have to type the whole name, nor does it have to be the starting characters.
Fuzzy match
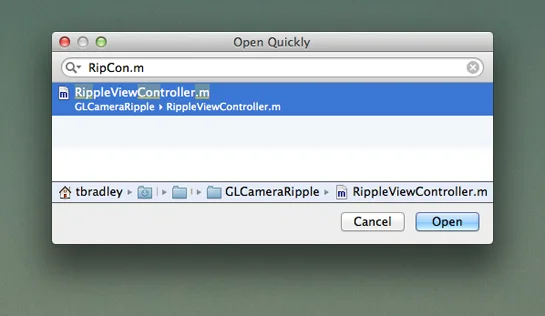
The characters don’t have to be contiguous either. For example, if you have a few matches up, finish with ‘.m’ to bring the implementation file up to the top.
Match with line number
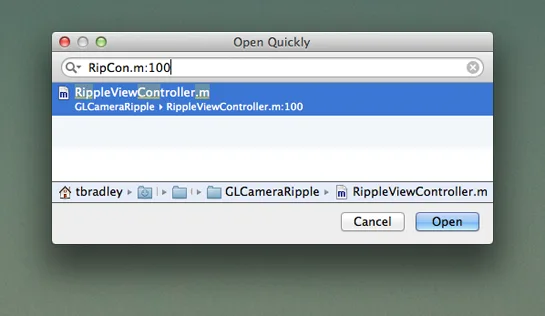
If it’s a file you’re matching, finish your search string with ‘:’ followed by the line number. This will jump straight to that line. Extra tip: paste in filename.m:123 from crash log stack traces to jump straight to that location in Xcode.
Opening the match once you have it up
To open the file, use the ↑ and ↓ keys to select it and then hit ↩. Alternatively double click on the file in the list.
Open in Assistant Editor
This works with the quick open dialog, but also anywhere you cause a file to be opened. Hold down ⌥ whilst performing the opening action. Places you can use this include:
- The Open File dialog
- The Quick Open File dialog
- Double clicking a file in the Navigator
- Go to definition on a symbol
Open in a new window
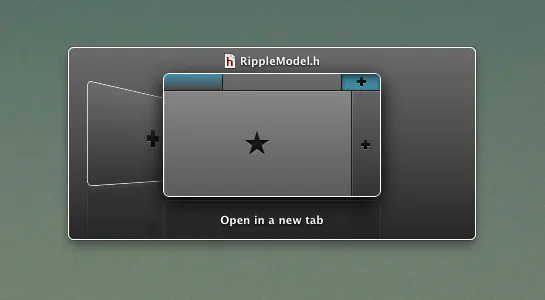
One of the complaints by many Xcode 3 aficionados about Xcode 4 was the lack of many open windows. If that’s your itch, it’s still possible to do. Hold down ⇧ + ⌥ whilst doing an open file action.
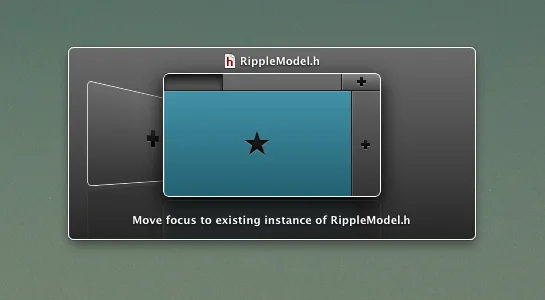
This time you’ll get an interesting new window up asking where you want it to go. Press ⌘ + ← followed by ↩.
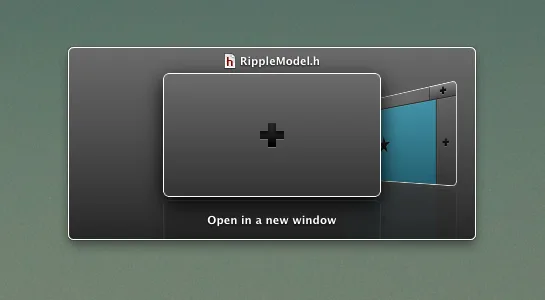
Open in another tab
From the same window as before (⌥ + ⇧ + open action) you can use the arrow keys to put the file in a new tab. This time hit ↑ and then → followed by ↩. This can be pretty useful if you’re taking a coding detour. Saving the tab setups “for me” is a bit like pushing a mental workspace on the stack.
Duplicate to Assistant Editor
Sometimes you’ll have a file up and want to move it to or from the assistant editor. I don’t know if it’s a handedness thing, but I prefer the file I’m actively working on to be on the left and the other on the right. To push the file over, hit:
⌥ + ⌘ + , - Open in Assistant / Primary Editor
Duplicate to any other window
Of course, sometimes you don’t just want the file to move to an assistant editor, you’d like it in a new window or tab. For this add the ⇧ key (are you seeing a pattern here’):
⇧ + ⌥ + ⌘ + , - Open In…
With all this jumping around it’s easy to get lost in the Project Navigator on the left as the selected file doesn’t get updated automatically. To sync it up to the currently opened file:
⇧ + ⌘ + j - Reveal in Project Navigator
Speaking of the File Navigator, it’s also possible to filter this using the search bar at the bottom. To jump there instantly and change or remove the filter hit ⌥ + ⌘ + j.
Conclusion
The shortcuts I’ve outlined are only really scratching the surface - things like the ‘Assistant Editor’ & ‘Counterparts’ could take a whole article on their own.
If you only remember one thing though - global help search when you can’t remember the shortcut.
⇧ + ⌘ + / - Search Help